Setting Computer Times
If a computer in your lab is showing the wrong time zone on its clock and you do not have a server, follow the steps below to fix it. If your lab has a server, follow the second set of instructions:
Step 1 - Thaw the computer in Deep Freeze
Step 2 - Right click the clock icon on the taskbar of the computer
Step 3 - Select “Adjust date/time”
Step 4 - Make sure “Set time zone automatically” is turned off.
Step 5 - Select the correct time zone.
Step 6 - Once the clock is correct, freeze the computer in Deep Freeze.
If your lab has a server, follow the instructions below to set the time to be the same on all computers:
Step 1 - Log on to the Server in the classroom using “Remote Desktop Connection” application on the Teacher’s computer. The computer name field should be already be filled in "(initials of the school)-cls-server" this is the name of the server. The credentials to login to the server should be:
Username: “Einstein” and Password: “e=mc2” without quotes

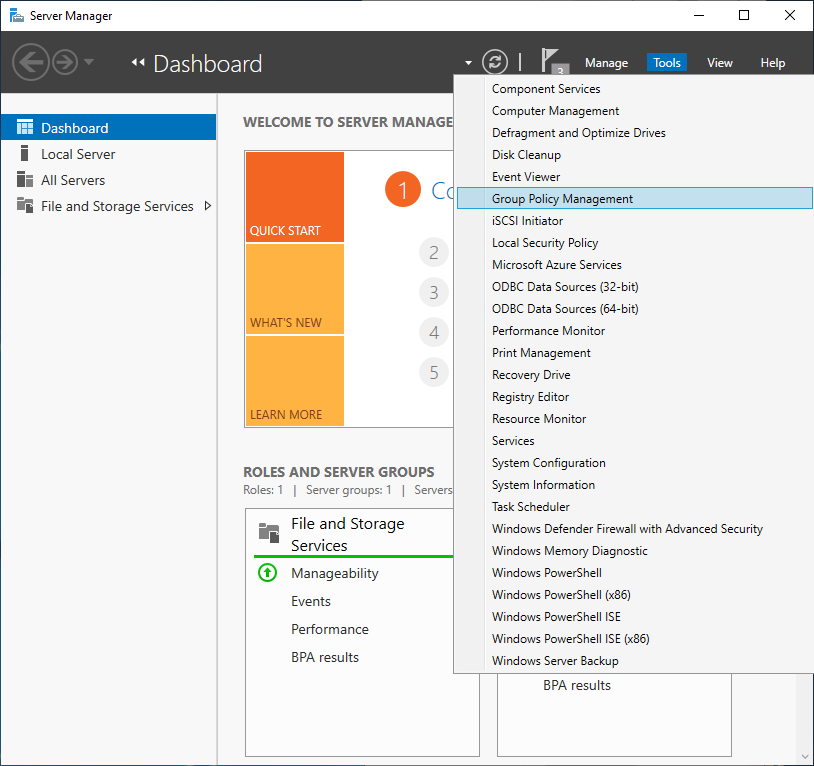
Step 2 - On the server, open the “Server Manager” Application by searching for it in the search bar on the server and after it opens go to “Tools” in the top right.
Step 3 - Select “Group Policy Management” in the Tools list.

Step 4 - Expand the Computer Configuration tree and drill down to the following path “Administrative Template > System > Windows Time Service > select the Time Providers folder
If the Local Group Policy Editor does not come up, search for ‘edit group policy' on the search bar instead.


Step 5 - Right click and select edit option for both the Configure Windows NPT Client and the Enable Windows NPT Client.

Step 6 - Click “Enabled” radio button on “Enable Windows NTP Client”
Step 7 - Go back to "Configure Windows NTP Client, enable it, and verify NtpServer is “time.windows.com,0x9” without quotes.
Step 8 - Set the Type to NTP.

Step 9 - Leave everything else default and click “Apply” in the lower right corner of the window.
Step 10 - Staying on the Server, open an Administrative Command Prompt and type in “gpupdate /force” without quotes. Press enter to run the command, this will force the Group Policy update.

Step 11 - After the command "gpupdate /force" is done running, restart the server and all the Teacher and Student computers and they will eventually sync right up and be exactly on time if not right away.